I had a chance to play a Bolt Action at Adler's Gaming Cafe last night. It was a great time with Walt and I taking on Gordon and his Fascist Italian Hordes. Set in a very European looking part of Tunisia, the roughly 1500 point game pitted Walt's excellent British Paras and my French Foreign Legion forces against a very stout Italian Army. As Walt observed during the game, "what a game - all kinds of weird vehicles, cavalry and sixteen different nationalities!" I could not have said it better!
We rolled for the scenario and came up with "Top Secret" First time playing it for both Walt and myself. Gordon provided a really nicely painted British pilot as the objective marker and we lined up the troops for a game of Capture the Flag a la World War Two!
The game went back and forth with my usual crappy dice rolling continuing from the very start (What is it about my mojo when playing against Gordon?). But after a couple of hiccups I managed to get on track.
I have some photos below of the game. Basically, my Veteran Legion Cavalry from the 1er Regiment Etranger de Cavalrie (1st REC) went out fast and secured the pilot. Gordon had trouble getting squads on the board at the beginning of the game failing to get his Camel-mounted Squad (yes, camels in the pine forests of Tunisia!) and his Cavalry Squad on the table for a turn or two. As the Italians drank their cappuccinos, I got to the pilot and it looked like a quick Allied victory. Then the Italian artillery came alive and 1st REC was reduced to three figures with 4 pin markers!
The middle part of the game saw me move my inexperienced Senegalese Tirallieurs up to support 1st REC while dodging artillery shells, a Bersaglieri squad, and Gordon's second version of his dreaded flamethrower tank! A couple of lucky moves where Gordon missed with the flamethrower (thank you BA version 2!) and the objective was handed off from the cavalry to the Senegalese. The race was on. Walt assisted greatly by killing Gordon's Semovente with his PIAT team, claiming that it was the first time that they had ever killed anything!
The game came down to the last order dice of the last turn with Gordon frantically trying to put a couple of pins on my Tirallieurs running off the board with the aforementioned British Pilot. Fortunately all of his rolls were whiffs! Walt stepped in to cover my retreat by putting a squad of Paras between the Senegalese and Gordon's dismounted camel jockeys and the game was a squeaker of an Allied victory.
Here are the pics:
 |
| 1st REC makes a dash for the downed British pilot hiding in the woods! |
 |
| Other French troops move up in support of the cavalry in the Forest of Death. Note the Anti-tank gun dead on the road on the right |
 |
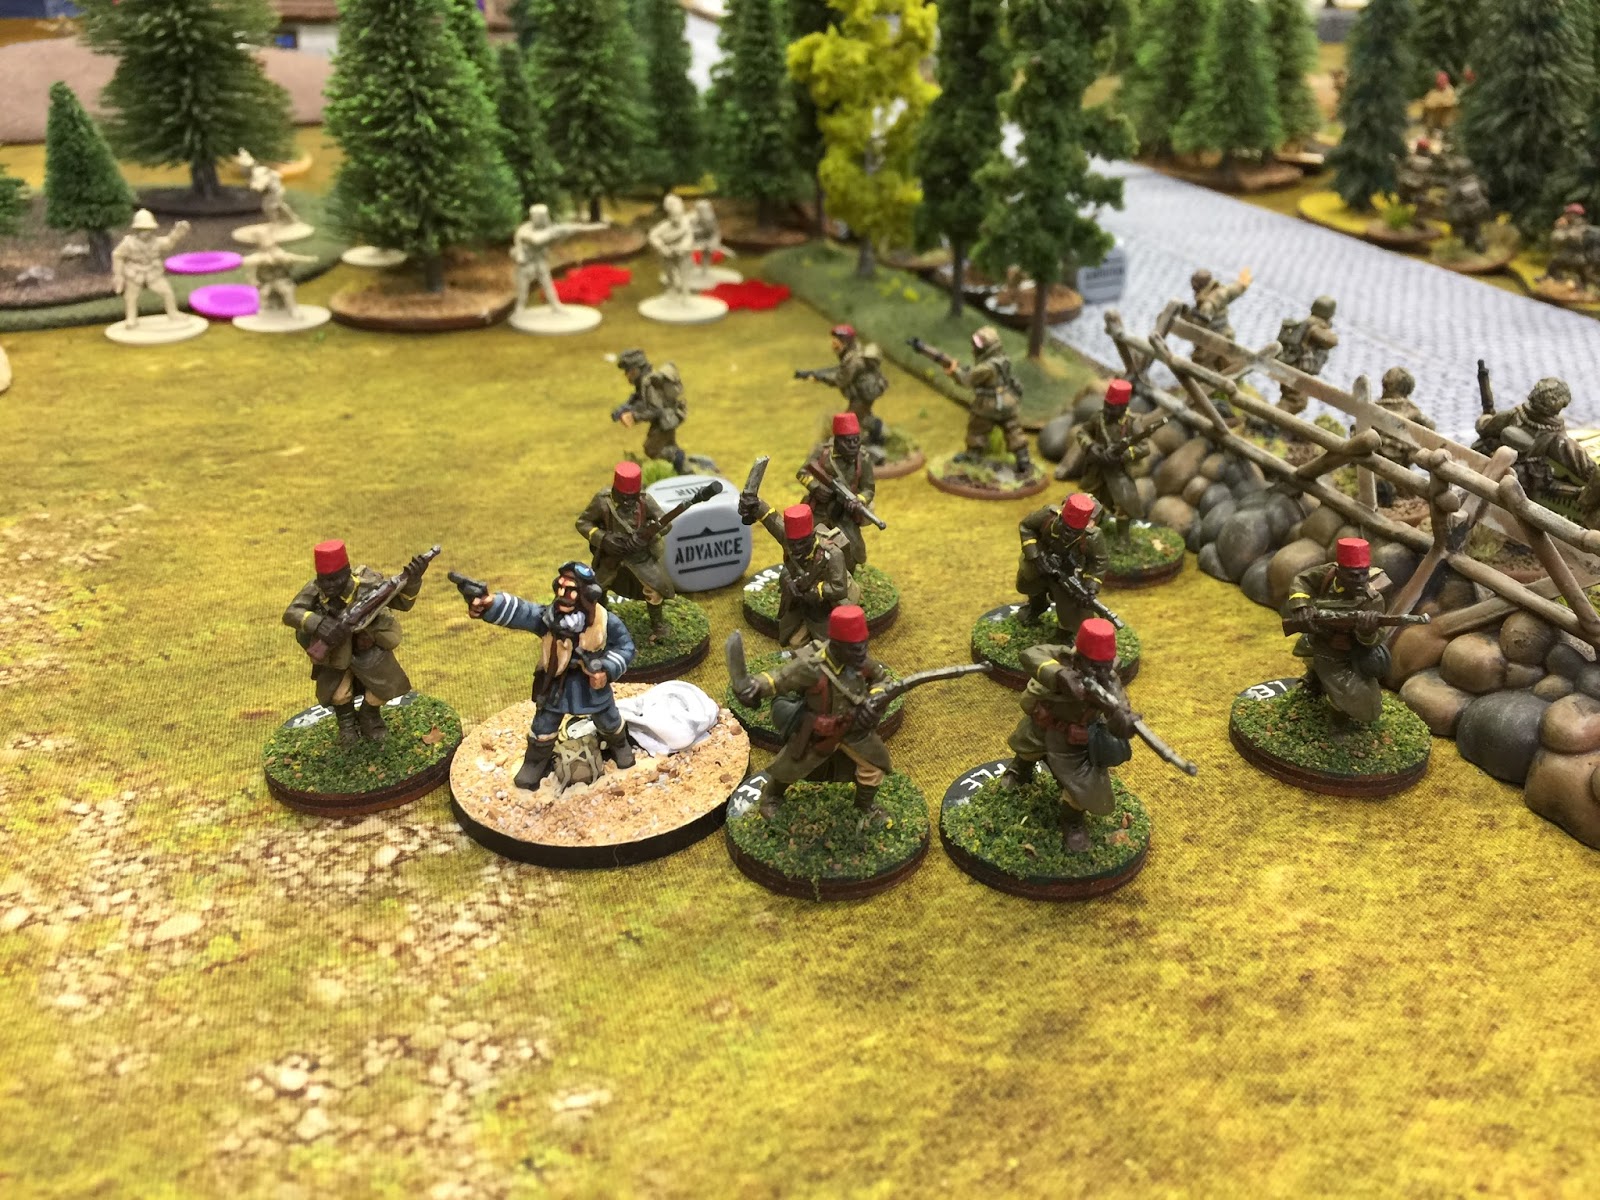
| One Italian Artillery shot, many dead French Cavalrymen! The Senegalese move up to try to help. The Semovente is at the top right and the Italian crazy Camel Corps is at the top center moving in to push the French off the objective. In an action reminiscent of Camerone the Foreign Legion cavalry defended the Forest of Death to literally the last man and got the pilot to the Senegalese. |
 |
| Another view of the Forest of Death. Note the Historique pin marker in the center with the Free French emblem. I really like these markers. |
 |
| Walt's Paras move up to put pressure on the Italians so they can't bring as much firepower to bear on my hapless French in the trees. The brave PIAT team is just visible at the top left of the photo preparing to take out the Semovente. |
 |
| Camels in a pine forest? Where are they all coming from? The dead marker in the bottom left was my artillery observer killed by a massive volley from the Bersaglieri just out of the photo to the left. |
 |
| Objective hand-off! Note burning Semovente in the upper right - thank you PIAT team! |
 |
| My French Armored Car sacrifices itself to try and block the Flamethrower Tank and effect the Senegalese squad's escape with the prize. Walt's Paras also try to get themselves between the Senegalese and their Italian pursuers. |
 |
| Gordon's desperate attempts to stop my fleeing Tiralleiurs. The Flamethrower misses, the Cavalry Squad and Bersalieri chase from the left. It is a swirling melee! |
 |
| Last turn and we have made it! Flight Lieutenant Bromhead-Smythe is saved! But he will suffer greatly in the coming years after seeing all of the carnage that his French allies and British brothers in arms had to endure so that he could be rescued! |
A great looking table, nice miniatures all around and a really fun game! Thank you so much to Gordon and Walt for a great time. Can't wait for the next game!