Saturday, December 31, 2016

2016 Year in Review

Happy New Year!  Here's toasting a great year around the gaming table!  The hobby year overall was a good one with new forces being raised and many a good time with good friends.  I gamed at my house, other's homes, at club game nights and at the Adler Games Cafe.  Very fun wherever I played! I look forward to even more good times in the coming year!

Here is my total of my wargaming activities for 2016.

Figures Painted
25-28mm
Figures - 136
Vehicles/Guns - 14
20mm 
Figures - 6
Vehicles/Guns - 2

Games Played
Bolt Action - 7
Napoleon's Rules of War - 4
Iron Cross - 1
Volley Bayonet & Glory - 1
War at Sea - 1
Brother Against Brother - 1

Other
28mm Figures Rebased - 11


I have to call this the year of the 28mm WWII armies.  I went for Bolt Action in a big way and right at the end of the year we have discovered "Iron Cross" which seems to have potential for a club game day WWII set-up.  We will have to see.  I'm not a fast painter at all but I think I did pretty well for me.  I have just about all of the Allied forces that I need for both BA and Iron Cross.  2017 will be my year to get an Axis force to get opposing forces on the table!

I really got away from my 20mm armies and games and maybe I can get back to them in the coming year.  I also got away from Napoleonics and War of 1812.  I hope Napoleon's Rules of War is published and we can do some gaming in that genre.

See you in 2017!

End of Year Game!

Today I had a chance to play "Iron Cross" for the first time.  I went to the Adler Hobby Game Cafe and got together with Gordon and our friend AJ for an initiation game.  As we were starting - in walked Bob O.!  He ended up joining us for a couple of turns learning the game along with me.  Bob and I decided to play on the same side reasoning that if AJ and Gordon beat us it would be the expected and if we won, it was because of our total mastery of wargaming in general!  Well, at the end of the game Bob and I had not shown our total mastery of wargaming to say the least.  We couldn't even blame it on the Dice Gods as there were very good and very poor rolls on both sides.  AJ and Gordon just used their army better than we did and in the end my French forces fell back in disarray.  Sort of just like the real Italian Campaign.

The game is very simple with only about 15-20 pages of rules including OB's.  A turn consists of each side playing a number of initiative chits with one per maneuver unit (half squad or vehicle) and then two or more for the unit commander.  Once all initiative chits are played the turn is over and the chits are collected up and a new turn starts.

The scenario today was four half squads of infantry, one light tank/recon, one medium tank, one SP ATG, one regular ATG, an MMG team, and a command team, one flamethrower team and one mortar team.  So each side started with 14 command chits.

The game is pretty simple in design but it really puts players in the role of a commander as the management of command chits is so integral to the success of your force.  Do we play more or less chits before passing to the other side?  Do you spend chits to take an opportunity fire shot and prevent an enemy unit from doing something?  Do you pass the initiative to the other side to make them spend at least one chit because they only have a limited number left?  The number of choices to make and the relative advantages and disadvantages of each possibility make it a very interesting game.

This was only the first game, and we have a long way to go before it is our favorite for WWII but the system definitely has some merit and I am looking forward to playing the next game!

Here are some photos of my brave RMLE (Regiment de Marche Legion Etranger) soldiers as they conducted their first operation under the Iron Cross rules.  I have provided comments to each of the photos.

An infantry section and flamethrower team move up the right flank.

In the center the commander leads the AT guns, an infantry section and the MMG team into the attack!

Two infantry squads move up the left flank with a medium tank in support (Grant standing in as a Sherman).

The view in the other direction of the center force with the Stuart Light tank covering the road. The yellow chit is a command chit.  The Free French marker is a "morale" marker recording the number of current hits on the unit/vehicle.

The Lee/Sherman is knocked out and its destruction has put a morale hit on the adjacent infantry section.


Sunday, December 25, 2016

BA Initiation of the Mid/Late War French

I played in a Bolt Action pick-up game at Adler's Gaming Cafe.  It was the initial battle for my mid/late war French Expeditionary Corps troops.  I wish I had picked a different night and a different opponent to debut the troops against.  I played against Don's "Dirty Germans" and his Falschirmjager made easy work of my troops as I tried to advance into the teeth of his veterans with multiple LMG's, MMG's and a horrifically effective Stug III!

Lessons learned - 1.  Don't bring light vehicles to an infantry urban fight; 2.  Don't hesitate in the face of really good troops - if you are going to die, do it with dignity on the attack!; 3.  At least try to roll one die that kills something during the evening!; 4.  Snipers SUCK!

I didn't take many pics as my troops were not on the board long enough to do anything!  Here are the couple I did take.  I was too busy getting my butt handed to me!

My troops try to fight through to the factory.  In the foreground is a recon jeep.  Mid photo is the 75mm SP ATG  and mortar crew.  The MMG was in the bomb crater but they fell victim to a German sniper during the first turn of the game.  Upper photo is the command group, bazooka team and infantry squad trying to take a covered route to the factory.  It would keep them safe for only a couple of turns.

A close up of the halftrack AT gun and the mortar team.

Overall it was a fun game.  Just wish that I had acquitted myself better as commander.  I look forward to getting another chance with them!


Tuesday, December 6, 2016

A Personal Moment

Here is a photo of our son, Andrew, 2nd Lieutenant, US Army, graduating from his Ordnance Corps Basic Officer Training Course.  We are very proud of him. Armament for Peace!


Sunday, November 20, 2016

French Expeditionary Corps - Italy 1943-1944

I completed my early war (1940-1942) French forces for Northern Africa.  I wanted to expand my Bolt Action Collection and decided that I would continue the French theme.  I have completed most of the vehicles for the force and I painted up the first couple of infantry squads and supports.  Here are the first photos of the force.  These are primarily French Foreign Legion troops which represent infantry from the Regiment de Marche Legion Etranger (RMLE) and Recon units from the 1ere Regiment Etranger Cavalrie (1 REC).

Here are the photos with explanation for each.  First the infantry of the RMLE:

Infantry squad of French Foreign Legion infantry in uniforms supplied by the United States.  The French were fond of wearing Adrian helmets or French tri-colors on US helmets.  It is said that they wanted to make sure that the Germans knew that they were facing French forces.

Another view of the French infantry.  The Foreign Legion usually kept their 'Kepi Blancs' for parades, but I decided that I wanted players on the Axis side to know that they were facing my best troops when the FFL is on the board!  All of the figures are plastic Warlord US Infantry with head conversions in metal from the Woodbine Design Company in Adrian Helmets and Kepis.

I couldn't resist putting an Adrian helmet on the bazooka man!

Here are the vehicles from the 1 REC - First the Recon elements:

A Reece Jeep with the section leader calling in a SITREP.  This is a Warlord resin vehicle crewed by figures from the Old Glory "Berlin or Bust" range.  I preferred these figures to the two man crew from Warlord with the ridiculous driver holding an M-1 carbine in a soft cap!

The Jeep not only provides the brigade commander with important intelligence reports, it also sports a Heavy Machine Gun so it can provide the platoon leader with critical firepower to help win the tactical fight.

The M3A1 Stuart Light Tank is the armored portion of the 1 REC.  The Stuart was not able to take on main battle tanks, however, it could easily handle other light tanks and armored cars.  And its three Medium Machine Guns is devastating when engaging enemy infantry.  Note that the 'White Clubs" and Roundel tactical markings is from the early war French markings sheet, but I thought they looked pretty cool so I went with them.

The tank bears the name of one of my favorite foods (Eclaire).

And here is some fire support for the Reece:


This is the M8 Scott Gun Motor Carriage (GMC).  Built on the M3A1 Stuart Light Tank, the M8 has a 75mm Light Howitzer as well as a pintle mounted Heavy Machine Gun.  This is a resin and metal model from the Old Glory "Berlin or Bust" range.  The model is on the slightly small size, but I think it is a good representation of the vehicle.


The crowded crew compartment of the M8 as the crew feverishly services the howitzer to get rounds down range.

Along with the M8 GMC, the French forces include a T-12 Halftrack GMC with a French 75mm dual purpose gun.  This vehicle provides not only Light Howitzer fire support, it also can provide medium Anti-tank gun support.  Here French gunners from the Regiment de Fusilier Marins man one of the halftrack guns.

I'm not sure that the French used this version of the M3 halftrack, but I do know that it was used by the British in Italy and the French probably had some also, so here they are.  It is just a really cool vehicle to have on the game table.  This is a Mad Bob model with crew, only change was a head swap to put on the Sailor hat on the Fusilier Marin.

Finally, here is a command vehicle for the company team:


An M3 White Scout Car set up as a recce vehicle from the 1 REC, but notice the officer in the rear of the vehicle.   This is a Warlord Games resin model with metal crew.  The heads are also from Gripping Beast WWI Adrian helmet and Zouave options.


An aerial view of the crew compartment.  Note this vehicle has an HMG and an MMG.  This makes this vehicle a potent combatant.  When it is not serving as a headquarters, this can be a troop transport for up to six troopers in the 1 REC. 


That officer in the Scout Car is not from the Foreign Legion, but what unit does he command?  Guess you will have to check back and find out when I get photos of newly painted troops up on the blog.

Saturday, October 29, 2016

Another Bolt Action Game

I had a chance to play a Bolt Action at Adler's Gaming Cafe last night.  It was a great time with Walt and I taking on Gordon and his Fascist Italian Hordes.  Set in a very European looking part of Tunisia, the roughly 1500 point game pitted Walt's excellent British Paras and my French Foreign Legion forces against a very stout Italian Army.  As Walt observed during the game, "what a game - all kinds of weird vehicles, cavalry and sixteen different nationalities!"  I could not have said it better!

We rolled for the scenario and came up with "Top Secret"  First time playing it for both Walt and myself.  Gordon provided a really nicely painted British pilot as the objective marker and we lined up the troops for a game of Capture the Flag a la World War Two!

The game went back and forth with my usual crappy dice rolling continuing from the very start (What is it about my mojo when playing against Gordon?).  But after a couple of hiccups I managed to get on track.

I have some photos below of the game.  Basically, my Veteran Legion Cavalry from the 1er Regiment Etranger de Cavalrie (1st REC) went out fast and secured the pilot.  Gordon had trouble getting squads on the board at the beginning of the game failing to get his Camel-mounted Squad (yes, camels in the pine forests of Tunisia!) and his Cavalry Squad on the table for a turn or two.  As the Italians drank their cappuccinos, I got to the pilot and it looked like a quick Allied victory.  Then the Italian artillery came alive and 1st REC was reduced to three figures with 4 pin markers!

The middle part of the game saw me move my inexperienced Senegalese Tirallieurs up to support 1st REC while dodging artillery shells, a Bersaglieri squad, and Gordon's second version of his dreaded flamethrower tank!  A couple of lucky moves where Gordon missed with the flamethrower (thank you BA version 2!) and the objective was handed off from the cavalry to the Senegalese.  The race was on.  Walt assisted greatly by killing Gordon's Semovente with his PIAT team, claiming that it was the first time that they had ever killed anything!

The game came down to the last order dice of the last turn with Gordon frantically trying to put a couple of pins on my Tirallieurs running off the board with the aforementioned British Pilot.  Fortunately all of his rolls were whiffs!  Walt stepped in to cover my retreat by putting a squad of Paras between the Senegalese and Gordon's dismounted camel jockeys and the game was a squeaker of an Allied victory.

Here are the pics:

1st REC makes a dash for the downed British pilot hiding in the woods!

Other French troops move up in support of the cavalry in the Forest of Death.  Note the Anti-tank gun dead on the  road on the right

One Italian Artillery shot, many dead French Cavalrymen!  The Senegalese move up to try to  help.  The Semovente is at the top right and the Italian crazy Camel Corps is at the top center moving in to push the French off the objective.  In an action reminiscent of Camerone the Foreign Legion cavalry defended the Forest of Death to literally the last man and got the pilot to the Senegalese.

Another view of the Forest of Death.  Note the Historique pin marker in the center with the Free French emblem.  I really like these markers.

Walt's Paras move up to put pressure on the Italians so they can't bring as much firepower to bear on my hapless French in the trees.  The brave PIAT team is just visible at the top left of the photo preparing to take out the Semovente.

Camels in a pine forest?  Where are they all coming from?  The dead marker in the bottom left was my artillery observer killed by a massive volley from the Bersaglieri just out of the photo to the left.

Objective hand-off!  Note burning Semovente in the upper right - thank you PIAT team!

My French Armored Car sacrifices itself to try and block the Flamethrower Tank and effect the Senegalese squad's escape with the prize.  Walt's Paras also try to get themselves between the Senegalese and their Italian pursuers.

Gordon's desperate attempts to stop my fleeing Tiralleiurs.  The Flamethrower misses, the Cavalry Squad and Bersalieri chase from the left.  It is a swirling melee!

Last turn and we have made it!  Flight Lieutenant Bromhead-Smythe is saved!  But he will suffer greatly in the coming years after seeing all of the carnage that his French allies and British brothers in arms had to endure so that he could be rescued!
A great looking table, nice miniatures all around and a really fun game!  Thank you so much to Gordon and Walt for a great time.  Can't wait for the next game!

Saturday, October 1, 2016

Volley Bayonet & Glory Wing Scale

Had a chance to play a game with my friend Ed using his new revisions to Volley, Bayonet & Glory.  We played two infantry brigades and one cavalry brigade per side.  The game plays very realistically and I think it is the best rules set that I have ever played for Brigade/Division Napoleonic's.

The table was 6 feet wide and 4 feet deep.  This was set up as a Spain scenario so there was only minimal terrain.  We were basically fighting over a small town with a well at a crossroads in the center of the table.

I moved forward very aggressively and ended up beating Ed to the village center.  I garrisoned the built up area with a stand of infantry and supported it with the rest of one battalion.  There was another battalion on the flank.  On his part of turn two Ed counter-attacked my forces in the village and ended up knocking me out of the built up area.  He occupied the village with his own infantry stand and he would stay there for the rest of the game.  I launched at least four separate counter-attacks of my own, but to no avail.

On turn four Ed had me seriously on the run.  He had conducted some really effective cavalry attacks using the Brunswick Hussars and it looked like my right flank was about to give in.  Just when all looked bleak, one of the Polish battalions decided it was time for the Brunswickers to head home and destroyed one of the Hussar squadrons.  Combined with the threat of charges from the Provisional Dragoon Regiment, Ed started to consolidate his gains on the flank rather then pressing home further attacks.

After turn five we faced each others lines and decided that there would be no further decisive attacks and called the game a minor victory for Ed.  He held the village, but couldn't finish me off.  I had been totally unable to move him off the crossroads.

Here are a photos that I took at the start of the game.


The battle lines face off across the table.  The French are in the foreground and the British/Allies in the back ground.  The village and crossroads that were the focal point of the battle are in the center of the photo.


The first (and only successful) French assault on the village.  I have pushed the British out of the built up area and garrisoned the town with my troops.  Looks like a pretty strong position.  But Ed needed only one turn to counter-attack and throw me out of the town.


Here are the results of Ed's counter-attack.  The 41st Foot has occupied the built-up area and there they would stay for the remainder of the game.


The brightest incident for the French was the charge of this squadron of the provisional dragoon regiment.  In a solo charge against the Swiss Regiment de Mueron (unstoppable until that point) the dragoons sent the Swiss packing!  This one action allowed the French and Polish units behind them to reorganize and stabilize what had been a very confused situation up to that point.


The Swiss at the end of their retreat from the dragoons (top center).  British artillery has reinforced the 41st Foot in the village.  The Brunswick Lieb battalion is on the right in a position to protect the Swiss and support the rear of the artillery.


Overall, this was a great game and I can't wait to play the rules set again soon!

Saturday, September 3, 2016

World War II Bolt Action Game

Had a chance to play a 750 point Bolt Action Game with my friend Gordon from Adler Hobby Shop on Thursday evening.  We had a great time with a French vs Italian action set in the N. African desert.  We randomly selected the scenario and ended up with Maximum Attrition.  It was a very appropriate scenario from Gordon's standpoint.  He did a great job tactically and in his dice rolling and the results were a 2 to 1 victory for his Italian army.  While it was a really bad game for me in every way, it sure did look pretty!

Here are a few photos I took while the game was going on:


War at Sea Game

Hello Everyone!

Just wanted to apologize for being away for so long!  Work and family have really taken over this summer and kept me away from the gaming table, and the painting table.

But we are back on an even keel (no pun intended as you will see) and I am back at the hobby to a degree.  The game to get me back into the swing of things was to host an Axis & Allies War at Sea game for my club game night last month.  The game was supposed to be for four players each controlling a small task force from the British, American, Italian or German forces available.

Due to a lack of attendance at the event, only one other club member and I were available to play the game so I took the Italians against Ross with the Americans.

In a word, Ross gave me good drubbing!  I only got away with the Roma (my battleship) and one cruiser meaning that I lost two cruisers and four destroyers.  I only managed to sink two of his destroyers and two cruisers. Additionally, I lost three of my four aircraft and Ross didn't loose any aircraft.  Oh well, we had a great time and it was good to play the game again.  It reminded me that it would be really fun to run a campaign using this rule system for the battles.

Here is a link to my friend AJ's blog with some photos of my game and other games during the event.

Sunday, April 24, 2016

Modern Bolt Action Game

Got to play a game of Modern Bolt Action, which I refer to as "Special Operations Forces", on Friday evening.  The game is a scenario I want to host at the Huzzah! convention in Maine in May.

My friends Ralph, AJ and Bob came over to the house to help me with the playtest.  All in all it went pretty well.  The scenario is 'Kittyhawk Down' from the 2016 Bolt Action additional scenarios. In this scenario there is plane carrying sensitive documents coming down slowly due to engine trouble.  Your force has to get to the plane and have at least one unit within 3" of the plane where it crashes by the end of the game.

We did not use all of the forces available due to there only being four of us to play.

We split up the forces by drawing cards randomly.  Most of the African forces (Bob and Ralp) were vehicles.  They only had one infantry squad.  They also had an FO controlling off-board medium mortar and to top it off they had a Huey Cobra Attack Helicopter.

AJ and I had primarily infantry for the insurgents, but we did have three heavy weapons and more importantly, we had a medium truck with ZU-23-2.

It was a very close game throughout with both sides rolling very hot or very cold - as always happens in a wargame!  The help came on when we botched up and brought the truck on too soon.  Then Bob whiffed on the shot and the truck survived.  Then we traded shots until the plane crashed right into the middle of the board between our forces.

There were two turns of fierce fighting and right at the end, the command group (LT an done other soldier) of the African forces managed to get within the required 3" of the crash site.  AJ and I failed to get our forces within 3" and we were not able to kill the command squad so the African government troops were able to eek out a victory.

Here are some photos of the game in action and before I cleaned up the terrain.


The table.  Government troops came in from the left, insurgents from the right.


The crash site after the battle.  Red markers show where figures were killed during the fight.  The markers around the aircraft on the right was where one of my squads was wiped out trying to hold the objective.


The last turn of the game and I couldn't get the fresh squad in the cover area to pass their cohesion test and go out towards the aircraft.


My 14.5mm AA gun which did some real damage during the game including wiping out one of Bob's infantry units and destroying an Armored Car.


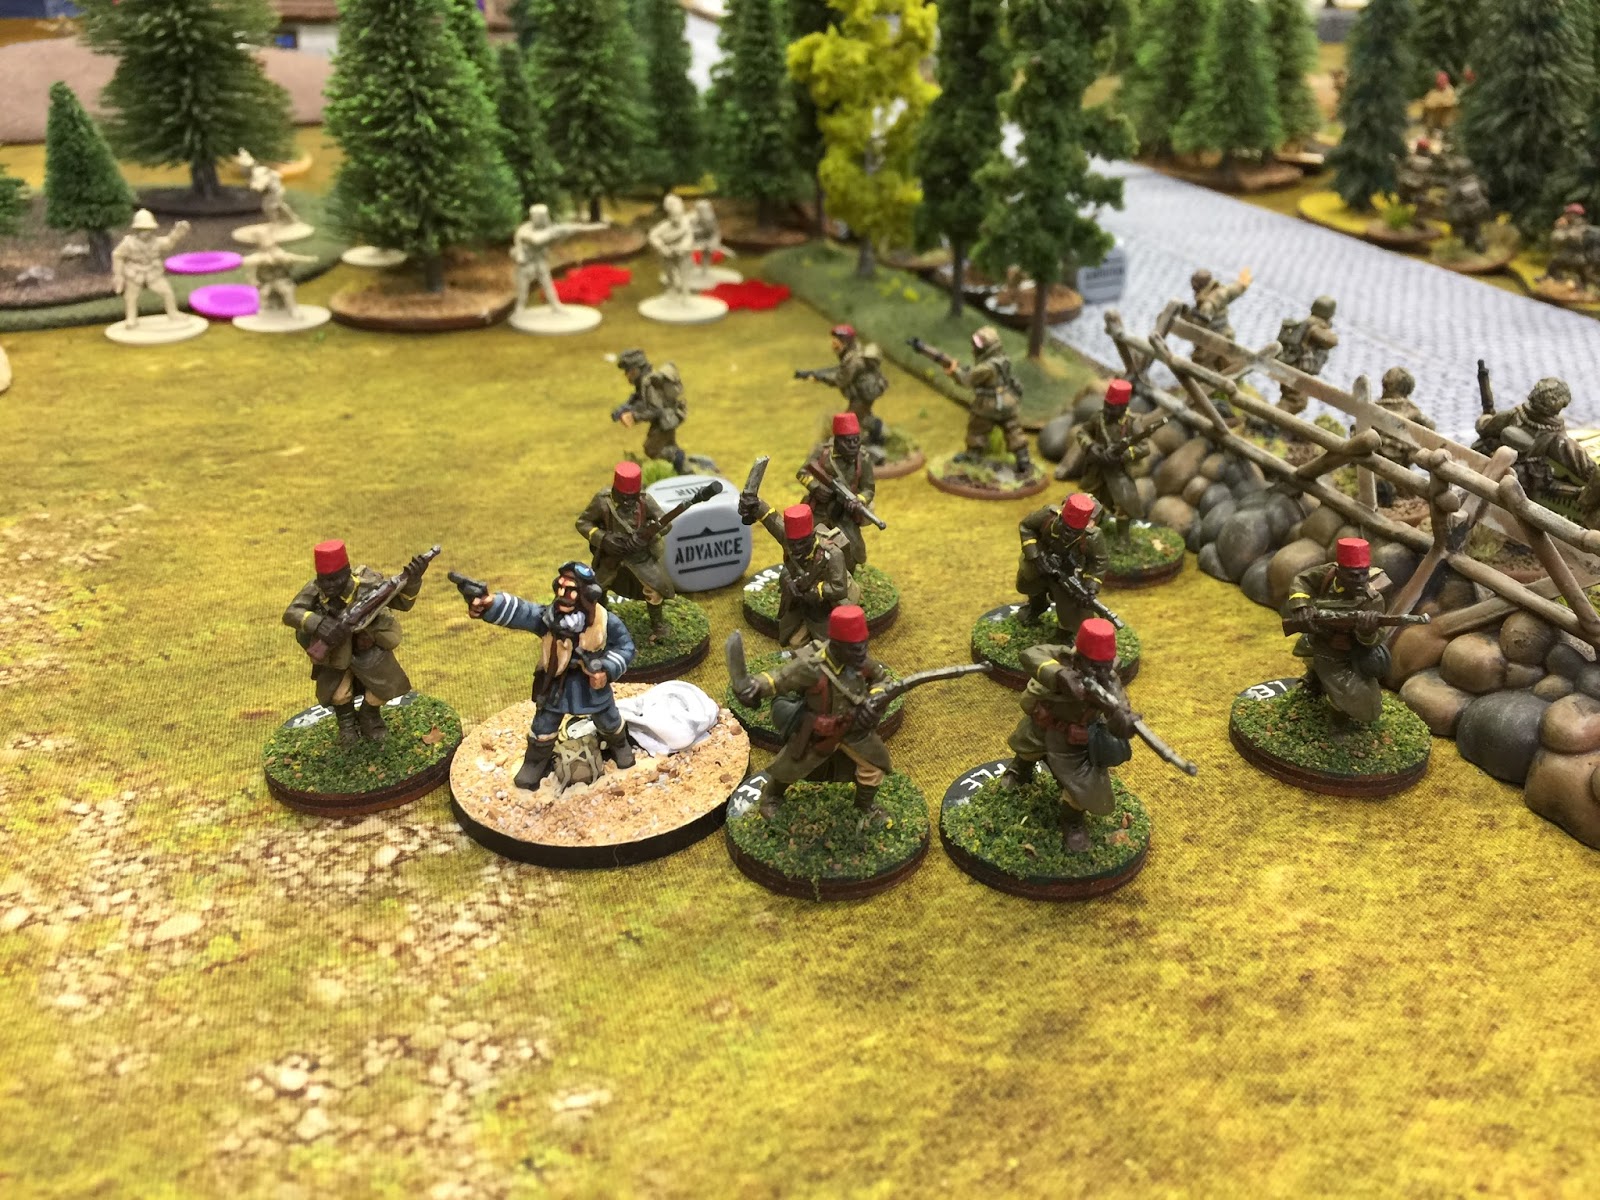
The heroic Lieutenant and his radio operator fighting to within 3" of the crashed plane and securing it for the win!  We just couldn't root them out of that cover!


African government troops and even a French Special Forces sniper team upper right of the photo.


The truck with ZU-23-2 AA gun.  The smoke/fire marker just below it was where the helicopter crashed.  My daughter's cat loves to try to destroy the helicopter so I had to move it to a safe location before I had a chance to take a photo.

Overall I am very happy with the scenario and I think it will go over very well at the convention.  I have to get the forces split up into "commands" which I can give to each player and that will also allow me to balance the game depending on how many players show up at the table.


Monday, March 21, 2016

Napoleon's Rules of War

   Played a game of Napoleon's Rules of War a great set of rules developed by fellow NC Penguin, Charlie, and refined by our club over the past several years. With the basic unit of infantry battalion, artillery battery and cavalry squadron, this game is fast paced and very realistic.

   We played a great game of French vs. Austrian of several Austrian divisions attacking several French divisions during a club game day.  It was a huge game involving the equivalent of two corps + on each side.

   Here are a couple of shots of the battlefield at the end of the day on our table.  This represented about 1/4 of the entire game!

The French on the left have crushed an Austrian Division and the center and right have stabilized after being pummeled by well coordinated and executed infantry and cavalry attacks. 

The Austrians push hard on the French Right Flank.  The Hussar Regiment at the bottom center of this photo especially covered itself in glory destroying no less than two French battalions and threatening to completely break into the French line of communications.

The Carabiniers go into the attack, supported by a battery of Horse Artillery.

I had a really good time playing this game, even though I did not play especially well.  On our side, Robert R. did such a great job that he won the Legion d'Honneur as the best French player of the day.