Showing posts with label Cavalry. Show all posts

Monday, March 17, 2025

Lots of Gaming Lately

 I have been playing games lately - just haven’t been able to do battle reports. Over the past three weeks I have played  two WWII era games of One Hour Skirmish Wargames. I also played one game of Brother Against Brother  and one game of Chocolate Box Wars.

Here are some random pictures of the games (Note: As I uploaded these, I realized I don’t have any of the OHSW games.  I’ll see if any of the other players took any and share later.)


Setting up the Brother Against Brother (BAB) game. Setting is the Indian Mutiny with the British moving to relieve the siege of Lucknow. TONS of TROOPS!!!

Nobody said the British were going to have an easy go of it! The objective is to cross the table and get over the bridge. Lots of Mutineers in the way. 

About half way through.  2d10’s worth of movement is excruciatingly slow!

When we called it a night. We made it about halfway across the board. It was bloody with lots of losses on both sides. Ralph did an excellent job of getting as far as he did while blasting away at the rouges trying to stop us. 

My Chocolate Box Wars game with Charlie.  It was the first game for both of us in our club round robin tournament campaign. I am using a British Interventionist division circa 1866 and Charlie has a Franco-Prussian era division. Here is my initial deployment. 

Early game.  Both of us moved on our left flanks in strength. 

My light cavalry squadrons did excellent flank guard work on both sides of the army. They destroyed or helped destroy three stands of Charlie’s forces. 

Late game. I tried so many times to get one more hit on Charlie’s badly shot up stand!  At the beginning of the next turn I finally put the last hit on him and ended the game. 

Here is the final location of the survivors. It was a, “short sharp action,” to be sure. Good thing we can re-constitute the division for the next game or we would be in a world of hurt!

All in all both of these games, and the One Hour Skirmish games were loads of fun.

Sunday, February 16, 2025

New Units for Chocolate Box Wars

 My painting table has definitely been slanted towards CBW armies lately, especially focused on American Civil War (ACW) Union and Confederates. Here are some photos of my recent figure painting.


In CBW a command stand option in the army build is called a “Chief of Staff”.  Here is my Confederate Chief of staff. A Perry Miniatures artillery officer. I painted this myself. 

For the Union I added a dismounted cavalry unit that I can use as my Light Infantry selection or even a Rapid Fire unit given their carbines.

The other stand of Union dismounted cavalry. 

Staying on the Union cavalry theme, here is my “Uhlans” option for the Union Army. These are the 6th Pennsylvania Volunteers- also known as “Rush’s Lancers”. I have always been fascinated by this unit and CBW is the perfect chance to do them up and get them on the table!


I hope you like these units. I now have three complete armies for CBW - Union, Confederate and British N. American Interventionists. I am rounding out some additional units so I can fill all of the available army building options so stay tuned for more photos in the (hopefully) near future. 


Thursday, December 26, 2024

Chocolate Box Wars - First Armies

 I have been playing a lot of Chocolate Box Wars (CBW) during 2024.  This is a set of homegrown rules by my friend Ed of Ed M’s Wargames Meanderings blog https://edmwargamemeanderings.blogspot.com/. You can find everything about CBW including rules, playing aids and extensive material on building forces in different areas around the world. This is a great game focused on the mid 19th Century (1840-1880) rifle-dominated battlefield. There were a myriad of wars, small and large, where weapons became more deadly and leaders struggled to determine the best tactics for the new age.

Ed and others in our gaming club are collecting and building European based armies.  Just so we have more options for gaming, I decided to focus on N. America.  My first army is the Union Army of the American Civil War (ACW).  Here are some photos of my Union troops:


Here is my complete Union Army ready for combat.  


My Union army is composed of (left to right) four regular infantry regiments, the Berdan Sharpshooters, a Zouave regiment, Iron Brigade regiment and artillery battery, 2nd Dragoons cavalry regiment, a command stand and an ADC (second in command) stand.


A work in progress shot of my Iron Brigade veteran infantry unit. 

Work in progress of my Union artillery battery. 


Having the Union Army, I now needed an opposing force.  I decided to raise a British force based on the excellent Perry Miniatures British Interventionist Forces. With the Fenian movement threatening an invasion of Canada at the end of the ACW, the British moved several units to reinforce Canadian militia units along the Niagara Peninsula.  The British were also supportive of the Confederacy and so these forces along the northern border could have engaged in combat with Federal forces.  In fact, I am working on a scenario for a future club game night that I call ‘The 2nd Battle of Lundy’s Lane’ with an 1866 version of the War of 1812 battle.  Here are some photos of my British CBW forces:


My British Army ready for battle!

My British Army is made up of (from left to right) a Confederate infantry regiment Auxiliary unit, four regular infantry units (including a Gurkha battalion), a Royal Artillery battery, the combined Guards light Coys, the 42nd Royal Highlanders veteran regiment, the 11th Hussars and my commander and ADC.


A work in progress of my British 11th Hussar Regiment.

A work in progress of the combined Guard light companies which is my light regiment. 

These forces are great base forces for my CBW armies. I am adding to them and will publish more photos as I get into 2025. I also have a new front on the N. American area of operation. I am currently basing forces for a Maximillian Adventure of my own - a ‘What if?’ of the Union Army chasing Franco-Mexican Imperial forces along the Rio Grande River.  Who knows, maybe some rouge Texas Confederates will join the Imperial cause in fight the hated ‘Bluebellies’!


Saturday, September 2, 2017

Finally Back On-line - Chosen Men Game Report

Well, it has been a long time away, but I am finally back!  I have had a great summer doing some traveling and having many visitors at the house.  It has been a good time, and now as fall is on the horizon and the trees start to change from green to various tones of yellow and red, I am returning to the hobby table.

Last night I traveled to Manchester and tried out the new (for us) Chosen Men rules from Osprey Publishing with my friend Gordon.  We did a pretty simple scenario using my War of 1812 figures.  Gordon played the British and I handled the Americans.

The British had two infantry squads, a Major Commanding Officer and a single Spy (horse mounted). As the Americans, I had a Major Commander, two infantry squads and a half/squad of Riflemen.

Gordon set up a great looking table.  Because we were both playing our first game of CM we took it very slow and basically read through the rules as we played the game.

Here is a couple of photos of the game as we came together at the end of Turn 1.

Americans on the right and British/Canadians on the left.  The Americans defended the wall very effectively and  we used the 'Feint' strategy to make the British Light Infantry squad to break cover and charge.  They ended up being short of the Americans during the charge and were out in the open to be fired on.  Gordon decided to try and shoot it out with the Americans and even with his great rolling, the wall provided enough cover to leave the Americans in possession of the wall at the end of the game.


I did not take any other photos as we were spending so much time reviewing rules and concentrating on the game itself.

The rules themselves are pretty interesting.  We each had four units and that seemed to be about right for what a new player can handle within an evening game for fun.  We played about three and a half hours of actual game time.  We played through five turns during the game and by the end of the game I think I had a pretty good sense of how to play.

The game mechanics are interesting with an alternating of units moving through its actions then an opponent's unit getting to play and back and forth until all units have moved.  That is one turn.

Infantry fire combat is a bit cumbersome with three die rolls, hits-saves-kills.  It could probably be reduced to two rolls if modifiers were inserted at one or two levels, but if you are doing a beer & pretzels type of fun game have fun rolling your hearts out!

The other thing we learned is that cavalry is particularly effective against exposed infantry.  On two occasions Gordon killed several infantrymen with a single mounted figure (including all of the half squad of riflemen).  Infantry needs to be in the correct formation and needs to be under strong leadership to be effective against cavalry to their front.  We think that the Hold and Fire order is one of the potentially effective ways for infantry to confront cavalry.  Once contact is made by charging cavalry, they will be devastating on an infantry squad.  Of course, Gordon was rolling lights out, so that may have been part of the outcome.  Sometimes you can't fight General Dice!

We also noticed that as casualties increase the morale checks come more and more often. Gordon faced this with his Light Infantry in front of the wall.  He passed several checks but as the unit took additional casualties, he had to take more checks and he finally broke.

I like the rules.  I hope to have a slightly larger game sometime soon.  I hope the second game goes as well as this first attempt.

Saturday, October 1, 2016

Volley Bayonet & Glory Wing Scale

Had a chance to play a game with my friend Ed using his new revisions to Volley, Bayonet & Glory.  We played two infantry brigades and one cavalry brigade per side.  The game plays very realistically and I think it is the best rules set that I have ever played for Brigade/Division Napoleonic's.

The table was 6 feet wide and 4 feet deep.  This was set up as a Spain scenario so there was only minimal terrain.  We were basically fighting over a small town with a well at a crossroads in the center of the table.

I moved forward very aggressively and ended up beating Ed to the village center.  I garrisoned the built up area with a stand of infantry and supported it with the rest of one battalion.  There was another battalion on the flank.  On his part of turn two Ed counter-attacked my forces in the village and ended up knocking me out of the built up area.  He occupied the village with his own infantry stand and he would stay there for the rest of the game.  I launched at least four separate counter-attacks of my own, but to no avail.

On turn four Ed had me seriously on the run.  He had conducted some really effective cavalry attacks using the Brunswick Hussars and it looked like my right flank was about to give in.  Just when all looked bleak, one of the Polish battalions decided it was time for the Brunswickers to head home and destroyed one of the Hussar squadrons.  Combined with the threat of charges from the Provisional Dragoon Regiment, Ed started to consolidate his gains on the flank rather then pressing home further attacks.

After turn five we faced each others lines and decided that there would be no further decisive attacks and called the game a minor victory for Ed.  He held the village, but couldn't finish me off.  I had been totally unable to move him off the crossroads.

Here are a photos that I took at the start of the game.


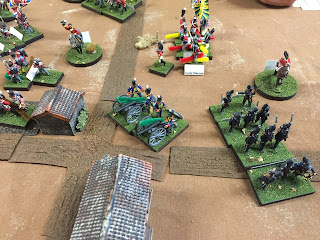
The battle lines face off across the table.  The French are in the foreground and the British/Allies in the back ground.  The village and crossroads that were the focal point of the battle are in the center of the photo.


The first (and only successful) French assault on the village.  I have pushed the British out of the built up area and garrisoned the town with my troops.  Looks like a pretty strong position.  But Ed needed only one turn to counter-attack and throw me out of the town.


Here are the results of Ed's counter-attack.  The 41st Foot has occupied the built-up area and there they would stay for the remainder of the game.


The brightest incident for the French was the charge of this squadron of the provisional dragoon regiment.  In a solo charge against the Swiss Regiment de Mueron (unstoppable until that point) the dragoons sent the Swiss packing!  This one action allowed the French and Polish units behind them to reorganize and stabilize what had been a very confused situation up to that point.


The Swiss at the end of their retreat from the dragoons (top center).  British artillery has reinforced the 41st Foot in the village.  The Brunswick Lieb battalion is on the right in a position to protect the Swiss and support the rear of the artillery.


Overall, this was a great game and I can't wait to play the rules set again soon!

Saturday, June 14, 2014

Meet Me At The Mosque - An Indian Mutiny Game

Last night I had the opportunity to play in a Brother Against Brother (BAB) game hosted by friend and club mate  Byron.  The scenario was East India Company troops supported by loyal Indians such as Gurkhas and Sikhs against mobs of Mutineers.

The victory conditions were simple; move to the mosque and secure the gunpowder cache stored there.  Attaining that goal was more difficult to achieve.  The British were commanded by Ed, Charlie and myself while the the Mutineers were ably led by Robert, Rob, Dave and Chris.

The sides entered at opposite corners of the board, trying to win the foot race to the mosque.  Our plan was as simple as possible.  Charlie had the majority of our troops (Sikhs, Naval Brigade and a couple of EIC squads) and his mission was to get into combat as quickly as possible on the left flank.  Ed took the next largest force (loyal Sepoys, and EIC European infantry) in the center to continue the line and be the base of fire as I advanced with cavalry and the two elite Gurkha squads.  Good plan and Charlie and Ed carried out their part to perfection, if only I could make decent move rolls!

Robert and I had cavalry squads that we charged forward headlong to block enemy infantry from the mosque.  We got one round of melee in, leaving his horse decimated and my squad leaderless.  When I finally got the leader replaced, I charged into the center of the mutineers and was promptly wiped out.  Ah!  Glad to see that I haven't lost my touch in destroying my cavalry command!

I also had the two Gurkha squads, but they had a combination of lead and concrete in their boots and I couldn't get them forward to the mosque!  I actually rolled two inch movements THREE TIMES on 2d10!!!  The last two turns of the game I managed to get a foothold in the mosque, where Robert had managed to get a couple of squads of mutineers.  We entered melee combat, but it was inconclusive and we were locked in melee when Byron called the end of the game.

The mutineers took serious casualties, as they always do.  Charlie did a great job decimating several enemy squads.  Ed added to the mutineer carnage with great long range fire from all his squads.  Havildar Rajput's squad had some especially devastating fire rolls!  But, of course, SGT Zanni took the credit for winning the battle single-handed lay in dispatches and he ended up with the VC and a peerage.

Here are some pictures of the beautiful troops and great terrain that Byron has for the game.  I especially like his buildings.  They are very detailed with complete interiors.

Overall a very fun game, using a great set of rules.  Great game night!  Thanks Byron!

Part of Charlie's Command - Naval Brigade Infantry and EIC lads.

Remnants of Mutineer Cavalary Squad after Ed's infantry got done with them.  The next turn a cavalry vs. cavalry melee took care of the rest.

British EIC cavalry after the melee.

Ed's Infantry force including some loyal Sepoys.

Center of the British line towards the end of the game.  This was a strong position and the Mutineers could not have overcome the firepower that issued forth from this position.