Showing posts with label Modern Wargaming. Show all posts

Sunday, January 26, 2025

Operation Torch - Angels 20/Bandits High Game Night

 I recently ran a game at our club game night. The scenario pits American Wildcats escorting Dauntlesses dive bombers flying in to support the upcoming American invasion by attacking Vichy gun positions and an airfield. Here at game night we had three Americans facing off against two French players. The French divided the forces into a squadron of three MS406’s and another of two D520’s. The American players divided their forces into a group of one Wildcat and two groups of a Wildcats and a Dauntless. The game proceeded well.  There were two new players and three veterans. We have great gamers in our club and within two turns the players had the rules down and were running the game themselves. 

The Wildcats are a really tough aircraft in this rules set and I tried to balance the forces by giving the French some positive pilot skills. The American players did a good job for the most part of holding the Vichy fighters off the Dauntlesses, but as one of the American players lined up a gun position for a bomb run and a Vichy D520 forced him to abort with a hit. The other Dauntless managed to hit and destroy the other gun position.

The Wildcats eventually shot down both D520’s and one of the MS406’s. One of the Wildcats ended the games crippled. This was definitely an American victory.  We did learn a lot by playing through the scenario. I’m preparing another D520 and will go with a French force of Three D520’s and two MS406’s in the next game. With the pilot skills, this should be a much more balanced force. 

Here are some photos of the game:

The furball forms as squadrons come together. 

A Wildcat takes on an MS406 at close range. 

I like the game mat. It is really for the Pacific, but works for my fictional scenario off the coast of N. Africa.

A crippled D520 tries to engage a Dauntless.

A Wildcat destroys a D520 with a vital hit roll.

My thanks to Gordon and Phil (Vichy players) and Kevin, Ralph and Michael (American players). This was a great game and I look forward to the next one at the Mayhem gaming convention in April. 

Sunday, December 29, 2024

Cold War Commander

A couple days ago, I posted photos of my Cold War Gone Hot French and Czech armies. I have been building these two forces to use in a hypothetical campaign set in the Federal Republic of Germany (FRG) in 1985. The rules that I’m trying for this campaign are Cold War Commander (CWC) which is a version of the Blitzkrieg Commander (BC) rules system.  BC is based on Rick Priestley’s Warmaster rules and have a solid game system using stands of infantry and individual vehicles to represent platoons  controlling eight to ten such units, a player fills the role of a Battalion or “Task Force” commander during a game. 

I have been on a search for many years for a set of Modern rules which would be the right combination of realism and simplicity for our club’s use. WWII gamers seemed really sold on Blitzkrieg Commander so I decided to give Cold War Commander a go.  The CWC rules seem to be a good balance of realism and play-ability after our first play test. I don’t have a full-blown game report of this game as my friend Ed and I were trying to work our way through the rules as we played. I did take some photos as we played and here they are:

I am using these individual buildings as villages in the rules.

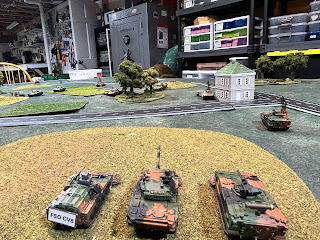
We set up a simple battlefield to try out the rules.  The Czechs attacked from the left and the French defended along the village/hill line to the right of the road moving away from the camera.

French armor platoons defend a village against Czech Recon units


French units, including a Forward Observer, control a kill zone in front of this hill.


Our club does tend to modify rules to meet when we think there are problems and CWC is no exceptions.  I have tried to simplify the rules a little bit so we can fit games into our typical 3-4 hour play time during monthly game nights.

As I said, this rules set seems to have possibilities and we plan to play more games during 2025, including a debut game night game in the summer.  I hope to add to the painted armies in the coming months and will try to give everyone a look at them as they are finished right here on the blog.


Thursday, December 26, 2024

World War III What If

 During 2024 I worked quite a bit on my armies for the Cold War Commander (CWC) rules system. In these rules each vehicle/infantry stand is a platoon. I was a cavalry officer in 1st Squadron, 2nd Armored Cavalry Regiment in the FRG 1983-1986. Part of our mission was to patrol along the FRG/DDR/CSR border.

Because of that US Army experience and my interest in just about everything French Militare, I have focused my WWIII interests to the southern area of operations. Hence my first units have included French and Czech armor and infantry units. Here are some pictures of the French units first:

Gazelle with HOT ATGM’s

AMX-30B2 Company HQ tank

A Company of AMX-30B2’s on line

AMX-10RC heavy recon company. 

VBL light recon vehicle. 

VAB light APC. 

French infantry platoon stand. 

Battalion command stand. 

VBL light recon vehicle with Milan ATGM. 

I really like the French paint scheme and I found an excellent set of decals from Peddinghaus 1/100 scale decal range for these vehicles. There are tanks, APC’s, Artillery, and soft skins on the sheet. The really tiny door decals on each of the wheeled vehicles are a pain, but they add a lot to the end product!  I am using a mix of Team Yankee plastics and resin vehicles as well as 3d printed vehicles. 

To face off with my French forces, I have Czech tanks, APC’s, SP Artillery, and command stands. Here are a few examples: 

OT-64C APC and BRDM command vehicle

An OT-64C Battalion ready for action!

A divisional reconnaissance battalion with BRDM-2 command and recon versions and BMP-1R’s including one with ‘Small Fred’ radar. Note the BMP-1R’s do not carry the Sagger ATGM. 

T-55AM Tank Battalion. 

Czech Battlegroup ready to invade the FRG!

I plan to expand my collection of 15mm moderns with Germans and Americans over the next few months. Just need to get another project done and I can get back into these. 

Thursday, November 28, 2019

World War Two Games

Over the past week I have had an opportunity to play two games of Iron Cross WWII. Both of them turned out very well.

The first game was at our monthly club game night hosted by my friend Charlie G.  The battle was an infantry and armor assault by New Zealand and Indian forces against the town of Cassino being defended by Falschirmjagers.

Here are some photos of the game

The entire table.  The British started on the near edge (Indian Infantry Company) and the right edge of the table (New Zealand Infantry Company and Armor Platoon).  The Germans (three reduced Falschirmjager Infantry Companies) set up within the town. 

The German command check the rules to see if they are short of MG42's!!  The Machine Gun squads would definitely play a huge role in the defensive plan.

The Allies look forlorn as (l to r) Bob, John, Ralph and Phil [just off-camera] endure yet another round of MG fire into their vulnerable infantry.  Just a couple of turns later they would be celebrating the victory as John moved up their armor and destroyed the German AT gun position.
The Allied attack developed slowly with the Indian units pushing in from the German left flank.  The New Zealanders moved very slowly but kept some pressure on the German front.  Being the first to attack, the Indians paid a heavy price as two machine gun squads tore into them.  Just as the Indian attack started to falter, one of the New Zealand companies rushed the right front part of the German defense and made it into the cover of some ruins without any casualties.  At the same time the Armor Platoon made a move up their right flank in an effort to assist the Indians.  The bold move did cost the tankers one Sherman as they advanced, but they pressed the attack.  Once the armor made it to the German flank, the Green Devils were not able to hit either of the remaining metal monsters with effective AT fire and the German AT gun position could not pivot to bring fire on the enemy.  In the end the AT position was destroyed giving the Allies a minor victory.  The win did cost the Allies dearly with almost two companies rendered combat ineffective and 1/3 of the armor force destroyed.

In the second game I had friends visit the house.  Andrew, his son Thomas and their friend Shaun visited and I set up a German vs British scenario to let them play the game for the first time.  Shaun and Thomas played with a couple of reinforced platoons against Andrew and I pushing British Commandos supported by a some armor assets.  The forces were exactly equal in numbers and composition.

Here are some photos of the game in progress:

The British try to push a flank using their Daimler Armored Car.  This would be the best shot of the game as the Daimler took out the German Armored Car with a very difficult shot.  I love it when Andrew S. rolls a 'six' at just the right time!  Unfortunately, it was just about the only positive aspect of the game for the Brits. 
The overview of the Armored Car shot up the left flank of the British advance.

The German Recon Platoon advances under the cover of an MG42 Support Squad.
Commando infantry take a commanding overwatch position on a hill.  In the distance, the Germans begin their well planned attack.

The British of 2 Commando push forward to seize a building enclosure and small woods.

A Commando Vickers MG Support Squad covers as a Commando Squad moves up.  Unfortunately, the infantry faltered a the wall and spent two full turns trying to get over the obstacle.  Their hesitation was a major negative factor on the British Advance.
This was a pretty one-sided game as Shaun and Thomas handed Andrew and I a real drubbing.  They had a better plan than we did; they moved better than we did; and they rolled their dice lights-out.  We played along the long axis of the table - and that made it a much more of a slugging match.  Not much room for maneuver.  But the Germans made the most of the terrain and with a slow advance by us British, the game was one-sided.

I'd like to highlight the game mat that we used for this game.  It is my new Killing Fields Static Grass mat that I just purchased.  I love the way the looks and mixes in with my other terrain and buildings.  If you like it, check out the Killing Field site HERE to get your own.

Club members and my friends really enjoy Iron Cross for our WWII skirmish/tactical gaming.  It is fast paced and the ability to distribute command tokens and activate units in any way during a turn makes players fully engaged in the game at all times.  I highly recommend that if you have an opportunity to play Iron Cross that you give it a try.


Saturday, July 20, 2019

Gaming for the 2nd Half of 2019

As I was looking at my Hobby Activities for the Year (See Below), I noticed that so far in 2019 I have played the largest number of different rule sets than any other year I've been in the hobby - by far.

It just seems that I have been willing to go out on a limb and try new things (such as Star Wars ver 2, Warlords of Erehwon, and GW Kill Team).  More so, it seems, then ever.  I'm not really sure why this is, it just seems to all be piling up this year.

And I don't think that the trend will be slowing down either.  Right now I am planning to play in a game of 'Fistful of Lead' later this month (I'm painting up some US Cavalry and Plains Infantry, complete with Gatling Gun for that game!).  I also have planned to try a game of Black Ops from Osprey War-games sometimes later this summer.  And right now I am reading another set of rules from Osprey, Rebels and Patriots, that I want to try out for that all elusive 'great' rules set for my War of 1812 skirmishes.

So many games, so little time!  I really want to settle on a rules that I enjoy playing and that I have enough painted minis to do effective games and/or campaigns.  There will always be one off games like the Fistful of Lead at my local hobby store, but I am talking about rules that I play enough to get comfortable with, or that I 'work harder' at so I can become somewhat proficient.  I don't ever want to 'work' on game system to be a competitive player, but I would like to develop a feel for some game systems so I can game master a game or campaign and be do a pretty good job.

Right now I think that is the following games in the indicated period:

Napoleonics
Volley & Bayonet Wing Scale
Napoleon's Rules of War

War of 1812
Volley & Bayonet Wing Scale (Ed's Edits) - For battles
Rebels and Patriots - For skirmishes

WWII
Cruel Seas - Naval
Blood Red Skies - Air
Bolt Action - Skirmishes

Modern
???

Sci Fi and Fantasy
X-Wing ver 2
GW Kill Team
Warlords of Erehwon

Ten sets of rules plus at least one for modern gaming!  Too many, I think.  But these are all rules that I have tried out and I really have enjoyed each one of them for their own reasons.  I think that I will have to consider them one-by-one and pair out the ones that I really don't want to play on a regular basis.

I have figures for most, if not all, of them so painting isn't really an issue - just have to finish off lead that I already have as I go along and then get stuff out to the table.  Terrain is also not an issue as I have all types of terrain already made for all of the scales of figures that I have and for all of the time periods and settings (Europe, N. America, etc.).

I will update the blog as I play through these.


Sunday, May 21, 2017

Huzzah! Game a Success

My game at Huzzah! on Friday night went pretty well.  I had six players and all seemed really engaged and interested in the scenario.  At the end of the game the Freedom Fighters (FF) had outgunned the French/Moan government troops and secured the crashed aircraft.  The dice gods were definitely against the French and government troops during the game as the Freedom Fighters had activation dice drawn consecutively on several occasions.  The FF players took advantage of the fortunes of war and took pretty aggressive actions which resulted in the destruction of government vehicles and several infantry squads.

Here are some photos of the action:

The Moan armored cars seize the crossroads on Turn 1.  They would not move again in the six move game!  

The Moan troops, from the 22nd Airborne Commando Battalion and the 63rd Mechanized Regiment move up to support the armored cars.  

Kitty Hawk down!  The aircraft crashed right near the crossroads.The armored cars had already been destroyed.  The Freedom Fighters have a squad along the wall of the building at the top right, a motorcycle rider at the bottom right and a squad in the building at the tail of the aircraft.  They also have the government troops in the building a the bottom of the photo under fire from several different units.  The French would try to close in from the top of the photo, but they would not be able to extricate the Moan troops from the kill zones.

The French troops coming to the rescue!  Well, at least they are trying.


The Freedom Fighters mass for the attack!

A close-up of some infantry of the Democratic Republic of Moa.

By the end of the battle, the Freedom Fighters had not only secured Kitty Hawk, they had destroyed eight of the allied units and killed or wounded several French soldiers.  The political fallout for the French government may be so severe as to cause the withdrawal of French regulars from the DRM.  What will happen as the Freedom Fighters continue their push south further into Moa?  Stay tuned to find out!

Thursday, May 18, 2017

Getting Ready for Huzzah! Game

Well,  the bags and game supplies are packed and I am ready to head out tomorrow afternoon for Portland and some time at Huzzah!  I am putting on a scenario using my modern 20mm Bolt Action figures at the convention.

My scenario is from the 2016 additional scenario pack and is called "Kitty Hawk Down!"  I have put on the scenario a couple of times, but using Bolt Action version 1.  I have made all of the appropriate changes for version 2 and we will have to see if the Modern rules play as well as they did in the earlier games.  This is the same scenario that I hosted at the club game night back in January.  During that game, the victory conditions were not met until the last couple of dice of the last turn.  To me that is a sign of a pretty balanced scenario!

If everything goes well I am going to use the results of this game as the start of a mini campaign set in the fictional African country - The Democratic Republic of Moa (DRM).

Watch this site for an update by the end of the weekend!  The player slots are full and I hope that all of the players have a really good time.


Saturday, January 14, 2017

Game Night Modern Bolt Action

Had a chance to host a modern BA game last night at the NC Club January Game Night.  The battle was the Kitty Hawk Down! scenario from the 2016 extra scenarios from the BA Forum.

The battle went really well and came down to the last turn when the French and African forces (under the command of AJ, Dave and Phil) finally overpowered the Rebels/Freedom Fighters (under the fanatical command of Warren and Paul).  While the Allied forces definitely killed more Rebels and destroyed more equipment, the victory came at a pretty steep cost with one European soldier killed and another one wounded, a Cobra helicopter shutdown, an African vehicle destroyed and several African troopers killed and others wounded.

Here are some photos that I took during the game with commentary:

Pre-Game Player Posing

The Cross Roads at the Center of the Table - Hey, is that motorcycle a combatant?

Yes, as a matter of fact - BOOM!  Of course, with the next French/Government Troop  Command Die the Motorcycle Died a not glorious death!
The remains of a Rebel HMG Team in a small copse of trees.


The last phase of the last turn.  The French are in a good position and the Rebels are making one last attempt.  Can they do it?

No - The French/African Government forces hold the objective at the end of the game!  The UN envoy is saved and given the differences in casualties it is a major victory for the Allies!  Unfortunately, there will be a military funeral in Paris as the French Sniper team was taken out by his Rebel counterpart. C'est la vie! C'est la guerre!

Sunday, April 24, 2016

Modern Bolt Action Game

Got to play a game of Modern Bolt Action, which I refer to as "Special Operations Forces", on Friday evening.  The game is a scenario I want to host at the Huzzah! convention in Maine in May.

My friends Ralph, AJ and Bob came over to the house to help me with the playtest.  All in all it went pretty well.  The scenario is 'Kittyhawk Down' from the 2016 Bolt Action additional scenarios. In this scenario there is plane carrying sensitive documents coming down slowly due to engine trouble.  Your force has to get to the plane and have at least one unit within 3" of the plane where it crashes by the end of the game.

We did not use all of the forces available due to there only being four of us to play.

We split up the forces by drawing cards randomly.  Most of the African forces (Bob and Ralp) were vehicles.  They only had one infantry squad.  They also had an FO controlling off-board medium mortar and to top it off they had a Huey Cobra Attack Helicopter.

AJ and I had primarily infantry for the insurgents, but we did have three heavy weapons and more importantly, we had a medium truck with ZU-23-2.

It was a very close game throughout with both sides rolling very hot or very cold - as always happens in a wargame!  The help came on when we botched up and brought the truck on too soon.  Then Bob whiffed on the shot and the truck survived.  Then we traded shots until the plane crashed right into the middle of the board between our forces.

There were two turns of fierce fighting and right at the end, the command group (LT an done other soldier) of the African forces managed to get within the required 3" of the crash site.  AJ and I failed to get our forces within 3" and we were not able to kill the command squad so the African government troops were able to eek out a victory.

Here are some photos of the game in action and before I cleaned up the terrain.


The table.  Government troops came in from the left, insurgents from the right.


The crash site after the battle.  Red markers show where figures were killed during the fight.  The markers around the aircraft on the right was where one of my squads was wiped out trying to hold the objective.


The last turn of the game and I couldn't get the fresh squad in the cover area to pass their cohesion test and go out towards the aircraft.


My 14.5mm AA gun which did some real damage during the game including wiping out one of Bob's infantry units and destroying an Armored Car.


The heroic Lieutenant and his radio operator fighting to within 3" of the crashed plane and securing it for the win!  We just couldn't root them out of that cover!


African government troops and even a French Special Forces sniper team upper right of the photo.


The truck with ZU-23-2 AA gun.  The smoke/fire marker just below it was where the helicopter crashed.  My daughter's cat loves to try to destroy the helicopter so I had to move it to a safe location before I had a chance to take a photo.

Overall I am very happy with the scenario and I think it will go over very well at the convention.  I have to get the forces split up into "commands" which I can give to each player and that will also allow me to balance the game depending on how many players show up at the table.